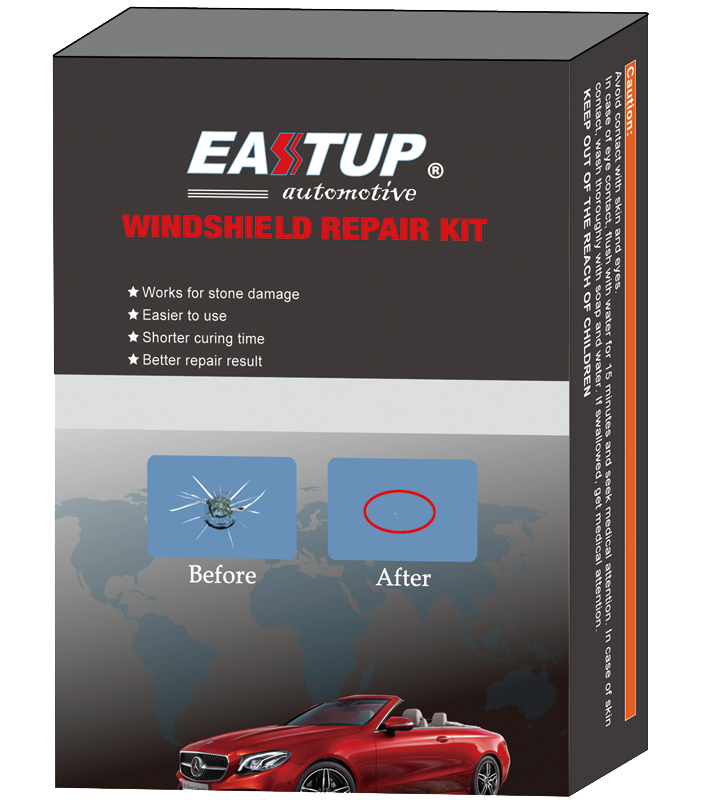
Item: Windshiled Repair Kit (EASTUP 車用 ガラスリペアセット ひび割れ 補修 フロントガラス ウインドリペア リペアキット 日本語説明書付き 飛び石 傷 修理 穴埋め 修復)
Brand: EASTUP
Part Number: 80004
UPC:742790758548
Kit Contains:
✓Repair Resin
✓Adhesive Seal
✓Pedestal
✓Injuctor with Spring Clip
✓Curing Film
✓Razor Blade
✓Push Pin
CAUTION
1. We strongly recommend repairing indoors, don't perform this
repair in the sun(except the last step), this resin in this kit is
UV resin, the UV light will cause it to cure at the wrong steps.
2. This product contains chemicals that will cause an acid burn.
Avoid all contact with eyes, skin and the body of the vehicle.
3. Windshield repair kit contains chemicals that will cause an acid burn.
Avoid all contact with eyes, skin and the body vehicle.
4,KEEP OUT OF REACH OF CHILDREN
Description
Thank you for choosing Eastup windshield repair kit, it worked
quite well on rock chips and bullseyes no longer than 1 inch that
can obscure your vision and make your windshield look junky.
Here is the video about how to repair a windshield:
http://www.americanexhibition.us/video.html
Instructions:
Step 1
Clean the damaged area of the windshield.
You aren't using Windex, however. Using a push pin, dig out any loose
chips of glass. Any loose pieces inside the damaged area could throw
off the repair
process so they need to be carefully picked out.
You'll also need a clean section of windshield to place the double-side
adhesive seal.
Step 2
Peel off one side of the backing of the adhesive seal and press it on the
windshield so that it completely surrounds the center of the break.
Firmly press the adhesive onto the glass, then put the rubber o ring into
the circle of the adhesive seal.
Peel off the other side of the backing of the adhesive seal and firmly
press the pedestal onto the adhesive seal so that its angles straight up.
Step 3
Snap or cut the tip off the tube of resin to open the stem, and place it
into the pedestal,slowly squeeze 4-7 drops, how many drops it
depending on width/depth of the chip, the resin should be just over
the chip, you can check it from the car inside, if you hope to repair 2
or 3 chips, then you shouldn’t waste much resin for the first chips.
Put the cap back on the resin and set it aside.
Resin will now be flowing into the broken glass area.
Step 4
With the plunger pushed all the way in, put the syringe into the
pedestal and push it into place so it forms an airtight seal.
Draw the plunger back to the indent near the tip of the plunger and
then twist it so it locks in the lower notch with the spring clip.
This will draw air bubbles out of the broken glass area.
Leave the syringe in this position for 10 minutes.
Step 5
Remove the syringe to break the vacuum and allow air into the pedestal. please don't move the place of the plunger.
Now, reinsert the syringe so that it is airtight again. Holding the syringe
in place with one hand, press down on the plunger with the other hand
and lock it in the upper notch.
In this step, you are using the sealed space, and the airtight
plunger, to force the resin down into the break. Leave the assembly in
this position for at least 20 minutes.( please make sure again this repair
didn't in the hot sun, because the hot sun will heat the air in the syringe
and pressure increasing then the resin maybe blow out between the
seal with glass or pedestal)
Step 6
Remove the syringe and use the razor blade to cut the
adhesive seal and pedestal from the windshield.
Maybe there is some resin will flow down, you can clean it by cleaning
cloth or paper.
Cut and clean the cured resin around the chip use the razor blade.
Step 7
Move the car into direct sunlight. Put 1-2 drops of the resin into the center of the break, quickly place a section of the clear finishing film over the still-moist repair area. Use the razor blade to carefully press the resin toward the edges of the film so that the resin evenly coats the area, and move out any air bubbles.You aren't trying to get it out of there fully, you just want it to be as thin and evenly spread under the film as possible. If it's a windy day you can add a little tape to the film to be sure the film can’t be lose.
Step 8
Let the repair resin dry fully underneath the clear film. You can let it set
as long as you want, there's no time limit.
The last thing you want is to pull it off while it's still wet. 15 minutes
(or an hour on a cloudy day). Don't start cussing if you pull it off too
soon. All you need to do is add a new drop of resin and re-apply a new
piece of film.Clean up your repair by scraping the excess resin from the
windshield with the razor blade.
